Pages

Friday, May 6, 2016

Islamic Important Dates


12 months,

  1. Muharram ul Haram
  2. Safar
  3. Rabi-ul-Awwal
  4. Rab-ul-Akhir
  5. Jamadi-ul-Awwal
  6. Jamadi-ul-Akhir
  7. Rajab
  8. Sha’aban
  9. Ramadhan
  10. Shawwal
  11. Dhul Qadah
  12. Dhul Hijjah


Lailat Al Miraj   27th of Rajab on year of 620 

Ramadan 9th month

Lailat Al Qadr

Eid Ul Fitr 1st of Shawal

Hajj    9th of Dul Hijjah

Eid Ul Adha 10 th of Dul Hijjah

Islamic New Year (Al Hijra) 1st Muharram. Prophet Muhammad PBUH had Hijrah from Makkah to Medina in year 622

Ashura  9-10 Muharram

Milad Un Nabi  12 Rabi ul Awal


Friday, March 21, 2014

How to Remove "Home" Under Blog Posts in Blogger

  • Click the "Template Designer" link under the top navigation bar.

  • Select "Advanced" in the left-hand menu of the Blogger Template Designer in the top half of the page. Scroll to the bottom of the Advanced context menu; then click "Add CSS."

  • Paste the following code into the "Add Custom CSS" input field:
    #blog-pager {
    display:none;
    }

  • Click "Apply to Blog" in the top right-hand corner of the page. This removes the "Home" link beneath blog posts on your Blogger blog.


  • How to Remove “Subscribe to: Posts(Atom)” Link From Blogger Blogs

    Here is some tricks to remove Posts (Atom) link in blogger blogs. In blogger, every post page have a link like “Subscribe to: Post (Atom)” as shown below  
    atom

    How To Remove Blogger Attribution Gadget

    The Attribution gadget is the gadget in the footer that says "Powered By Blogger". If you have tried to remove this then you may of noticed this gadget is locked into you blog. To unlock it, follow the next steps:

    blogger attribution, blogger hacks, powered by

    Creating a Blogger Static Home Page

    Seems like there's always an unusual case where you want to create a Blogger blog with a static home page instead of the reverse order blog posts instead. I see this question quite often in the forums and support pages of other sites. Though this isn't a typical configuration for Blogger, the recent changes in the new layout editor have made this easier than ever without having to spend time editing the template code as you had in the past.

    Add the Static Home Page

    The first step is to simply create a static page in Blogger called something like 'Home Page' from the Blogger Pages menu item. Don't call it 'Home' yet because we're going to alter the home link later. When you click on the 'Pages' left menu item in the Blogger editor main menu you'll see that there is already a 'Home' link on the screen. Ignore that for now--just go up to the 'New Page' drop down box and select the 'Blank page' option:

    Blogger static pages


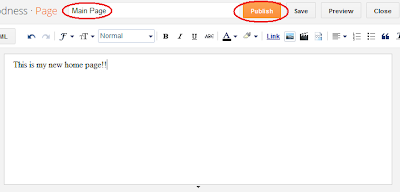
    You'll now be in the Page editor which looks a lot like the Blogger Post editor. At the top enter a page name such as 'Home Page' or 'Main Page' for now and some default text - we'll alter it later. Just go ahead and press 'Publish':

    Publish a Google Blogger page


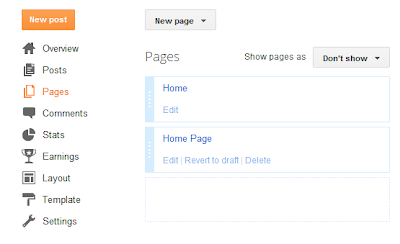
    You should now see two pages in your list; 'Home' and 'Home Page' like so:

    Blogger Pages


    Now that you've created a static page, the next steps are are a bit tricky since you need to make sure your static page becomes 'Home' and the old Home link is hidden especially if you want to use menus.

    Redirecting the Blogger Home Page to a Static Page

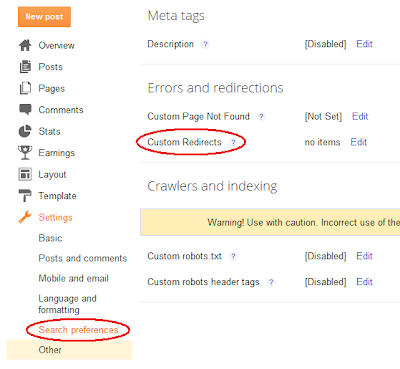
    The great thing about the new Blogger template is that you can redirect pages to other pages now in the 'Settings' menu. Oddly, it is buried deep within the Blogger settings under 'Search Preferences':

    Custom redirects in Blogger settings


    Go ahead and choose the 'Edit' text link just to the right of the 'Custom Redirect' item. Now, this is a very critical step - be sure to enter the following text into the From: and To: boxes in the Redirect dialog:


    In the From: box enter only a forward slash - "/". In the To: box enter the exact page name - in our case it was "/p/home-page.html". All Blogger static pages have a /p in front of the URL. You can see that the html name was the page title we used, so if you used something else for your title like 'Main Page' then the html would be /p/main-page.html.

    Go ahead and press the little 'Save' text link and then the 'Save changes' button highlighted in the image above. What's now going to happen is that your main URL will redirect to the static page you've created. Go ahead and try to access your blog now - you should go directly to the new static page from the main URL.

    All is good, right?? Well, not quite. If you want to enable visible tabs for Pages on your template the problem is going to be that you'll have two menu items called 'Home' and 'Home Page' on the tab bar both redirecting to your static page.  However, if you don't care to add Pages as tabs (they're not enabled by default) - you can stop at this point. Your static home page is ready to go!

    Enabling Tabs for a Static Blogger Homepage

    The very last step is to hide the original Home page link and add a page link to your blog pages so that the visible tabs work correctly. First, enable tabs from the Pages menu:

    Blogger Page tabs

    Be sure to press 'Save arrangement' in the upper right of the screen (not seen here)!  When you go to your home page you should now see the tab bar across the top of your blog. However, now when you click on either Home or Home Page you're going directly to your new static page. What you have to do at this point is hide the original 'Home' Page using the Layout editor. Open the Layout using the editor from the Blogger main menu:


    Choose the 'Edit' text link in the Pages item within the layout. This is going to allow you to hide particular pages. Once you open the Pages layout editor you'll notice that you can hide certain pages:

    Be sure to un-select the check box right next to the 'Home' page to make sure it stays hidden. Press 'Save' to hide that particular tab.

    The final step is to add another Page that links to the blog posts directly. This isn't something you have to do - your blog posts can still show on the right sidebar in the layout. However, if you do want to get back to the main blogging page that has the last posts together, you'll need to add a link back to them. Once we changed the Home page link to the static page there's no longer any links to the main Posts page.

    Go back into the main Blogger Page menu to add your link back as a menu tab. The first thing you'll notice is that the old Home page is now Hidden:


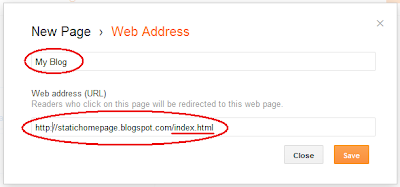
    The key final step here is that you will be creating a 'Web Address' page instead of an actual Page. Create a new web address page called something like 'My Blog' to be your link to the Posts like this:


    Adding a Blogger web link page

    The link you need to enter is simply your full main, blog page URL (in my example page it is http://statichomepage.blogspot.com) with the addition of '/index.html' added to the end of it like this:

    Linking back to the Blogger blog main page

    You're done!! If you look at your blog now, you'll see the top tab bar now has a Home link and a My Blog linked correctly to the right pages. I've created a sample site to show you the final outcome. Just click on the picture here to see it. Enjoy!!!

    Create a new page on your blog

    You can organize your blog into separate sections like “About me,” “Contact me” or “Advertise” using pages. Pages appear as either tabs on the top of your page or links on the side of the page. Pages differ from your homepage because they are usually used to display content that doesn't need to change very often. For example, the blog below has pages for “about me,” “workshops & classes,” “shop online” and more.

    Create a new page

    1. Sign in to blogger.com and click on your blog.
    2. Select “Pages” from the left navigation bar on your dashboard.
    3. Click New Page.
    4. Click Save to create a draft of the page you can review and publish later. You can also click Preview to open a new tab previewing what your new page will look like. Click Publish to create the live page on your blog now.

    Edit pages

    You can edit a page you’ve created to add new content, images, or videos.
    1. Select “Pages” from the drop-down menu of your dashboard.
    2. Click the “edit” link below the page you’d like to edit.
    3. Make edits to your page.
    4. Click Update to publish the page with your edits, or Revert to draft to publish the page later. You can also clickPreview to open a new tab to see what your edited page will look like.
    If you want to delete a page linking to an external site, you have to delete it from within the Pages gadget by clicking the “x” to the right of the link.

    Edit page layout

    You can change where your pages appear on your blog by adding the page list gadget to your blog:
    1. Select “Layout” from the drop-down menu of your dashboard.
    2. A preview of your blog’s layout will appear. Your can choose to have your pages appear on the top, bottom, right or left side of your blog. Click the “Add a Gadget” link beside the section where you'd like your pages to show. For example, if you’d like them to appear as tabs on the top of your blog, click the “Add a Gadget” link at the top of your layout.
    3. Select the “Pages” gadget from the “Add a Gadget” list.
    4. Under “Pages to Show,” check the boxes next to the pages you would like to display on your blog.
    5. Under “Page Order,” drag and drop the boxes to choose the order in which your pages will appear.
    6. Click Save.
    7. Click Save arrangement in the upper right to save your layout.

    Manage drafts and published pages

    You can navigate between viewing all your pages, just your drafted pages, or only your published pages using the sidebar on the left of your page. Under the “Pages” section of the sidebar, you should see categories for All, Draft, and Published with the number of pages in that status in parenthesis. You may also see a category for Imported pages if you’ve imported your pages from another platform like Wordpress.

    Create a page linking to an external site

    To create a page that links to a site outside of Blogger:
    1. Select “Layout” from the drop-down menu of your dashboard.
    2. A preview of your blog’s layout will appear. Click the “Add a Gadget” link beside the section where you’d like to show your pages.
    3. Select the “Pages” gadget from the “Add a Gadget” list.
    4. Click “+Add link page.”
    5. In the window that opens, fill in the page title and the web address you’d like to redirect readers to when they click on this page.
    6. Click Save Link.
    7. You should see the new page listed under “Page Order.” Click Save at the bottom of the gadget window.
    8. Click Save arrangement in the upper right to save your layout.

    Details about pages

    • Each blog can have up to 20 pages.
    • The way you choose to display your pages (for example, top tabs) applies to all of your pages.
    • Certain third party templates may not support pages as top tabs, but pages can still be added as side links.

    Thursday, March 20, 2014

    How to Add a Favicon to your Blogger Blog

    What's a favicon? Short for "favorite icon," it is the little icon that shows up in the browser bar next to the website address. Most savvy big-name companies have them, and they use them as a subtle reminder of their iconic brands:


    If you have a Blogger blog, even if you have a custom domain name, the standard Blogger favicon will show next to your site:


    So how do you get your own custom favicon for your Blogger blog?


    It couldn't be easier. 


    1. Create or choose a favicon. In Photoshop, create a square file and design a simple icon or logo. You can crop an image, use pre-set brush shapes (like a star), or use an existing logo. Once you are satisfied, resize the image to 16 x 16 pixels and save as a .png or .ico file. Remember to keep it simple, because the final image is so small. 


    • If you don't have Photoshop, just google "favicon generator" and a number of sites will help convert an image into the appropriate file.


    2. Go to the Layout setting. Find the tab entitled "Favicon" and click "Edit."


    How to add favicon on Blogger


     3. Upload the flavicon. Follow the prompts and save.


    Configure favicon on Blogger


    4. Be patient. This is the most important step. You will hit save and reload your page, and . . . nothing. It takes 24 to 48 hours for the change to take place, so don't despair. Before you know it, you will have a nifty favicon of your own: